3D Texture Effects: A Step-by-Step Guide to Creating Embossed & Varnish Prints on Your UV Machine
Struggling to create eye-catching textures on your UV prints?
If you're into UV printing, you know that adding 3D texture effects like embroidery or embossed looks can really make your designs stand out. But getting those effects right isn"t always straightforward. Maybe you've tried different techniques and still aren't getting the depth or finish you want. Well, you're not alone. Many printers ask, "How do I make embossed & varnish effects that look professional without investing in super expensive equipment?"
That's where understanding **3D texture effects** and how to apply them with your UV machine comes in. Whether you're a small shop or a large manufacturer, mastering these steps can boost your prints' appeal and add value to your products. Today, I"ll walk you through a clear, step-by-step guide to creating stunning embossed and varnish prints on your UV machine.
Getting Started with 3D Texture Effects on UV Printing
What Are 3D Texture Effects?
Basically, 3D texture effects are ways to add dimension and tactile elements to your printed surfaces. Think of raised logos, shiny varnish overlays, or embossed patterns that you can feel. They"re great for branding, product packaging, or customized gifts. By applying these effects, you make your prints more engaging and memorable—plus, they look high-end.
The Benefits of Using Your UV Machine for Embossed & Varnish Prints
- Cost-effective: No need for multiple machines or special post-processes.
- High precision: Digital control means detailed effects.
- Speed: Faster turnaround times for textured designs.
- Flexibility: Easily switch between different effects for varied projects.
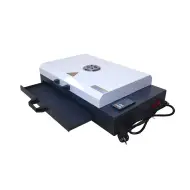
If you've already invested in a **spot UV printing machine**, like this Glossy UV Coating Printer, you"re halfway there. Now it's just about knowing how to use it for these special effects.
Step-by-Step Guide to Embossed & Varnish Effects with Your UV Machine
Step 1: Design Your Artwork Mindfully
Start with creating a vector-based design with layers dedicated to different effects. For embossed looks, define the areas that need to stand out, and for varnishes—identify zones to highlight with gloss or matte finishes. Keep in mind, the more detailed your design, the better the final effect. Match your design with your machine"s capabilities for ultra-fine detail.
Step 2: Prepare Your Files Correctly
- Use high-resolution files: At least 300 dpi to ensure clarity.
- Separate layers: One for base colors, one for embossed areas, another for varnish overlays.
- Apply proper color coding: Use spot colors to define where varnish or embossing should occur.
This step helps your UV machine process exactly what effect to apply and where to apply it. Think of it like giving clear instructions to a craftsman.
Step 3: Set Up Your UV Machine
Check your UV printer"s settings for the best results. For embossed effects, you typically need to adjust the curing zones, ensuring the areas designated for embossing cure properly without overexposure. For varnish, select the appropriate glossiness level and coating thickness. Some machines let you control the layer height to simulate depth.
Step 4: Perform Test Prints
Always run a small test first. Adjust the UV curing time, coating, and layer height—this step saves you from wasting material and ensures your effect looks perfect before the final run. Pay attention to how well the raised areas feel and how glossy the varnish appears.
Step 5: Finalize and Print
Once you"re satisfied with the test, proceed with your full print run. Keep the settings consistent. If producing a batch, double-check the calibration regularly so that texture and varnish finish remain uniform across all prints.
Tips to Maximise Your 3D Texture and Varnish Prints
- Use high-quality substrates: Smooth, glossy surfaces work best for embossing and varnish effects.
- Layering: Add multiple coats of varnish for richer shine or deeper embossing.
- Mix textures: Combine matte and gloss varnish for contrast.
- Limit effects to focal points: Don't overdo embossing or varnish—highlight only key areas to avoid clutter.
- Experiment with thickness: Thicker layers will increase depth but may require longer curing times.
And don't forget, practice makes perfect. The more you experiment, the better you"ll understand your machine"s nuances. I once chatted with a client who started with simple logos and soon moved to creating embossed packaging with stunning tactile effects. Now, they're winning awards for packaging design.
FAQs About 3D Texture Effects on UV Machines
Q1: Can I create embossed textures with a regular UV printer?
Yes, many UV printers allow you to create embossed effects if they support spot UV coating and layered printing. Make sure your machine can handle multi-pass or variable layer heights.
Q2: How do I ensure the varnish stays glossy and doesn"t smudge?
Use high-quality UV-curing varnish and adjust your curing settings accurately. Avoid excessive handling immediately after printing. Proper ventilation and drying times also help.
Q3: What's the difference between matte, gloss, and satin varnish finishes?
Glossy varnish creates shiny, reflective surfaces—great for highlighting details. Matte reduces glare, offering a softer finish. Satin offers a balanced, semi-gloss appearance. Choose based on your design goals.
Q4: How thick should the embossing layer be?
This depends on your design and substrate. Typically, 10-50 microns works well for embossed effects. Use your machine"s settings to control layer height and test before mass production.
Q5: Can I combine embossing with other effects, like foil or spot colour?
Absolutely. Combining effects can add a lot of value. Just make sure your design files are well-organized and your machine settings are adjusted accordingly for each effect.
Ready to upgrade your UV prints? Mastering 3D texture effects like embossed and varnish prints can be a game-changer. With the right setup and practice, you'll be creating premium-looking products that really stand out.
Advanced Technical Insights & Application Analysis
One of the key aspects that make UV printers suitable for creating 3D varnish & embossing effects is their exceptional ink adhesion and curing efficiency. UV-curable inks are specially formulated to adhere to a variety of substrates, including non-porous surfaces like acrylic, metal, and glass. This flexibility allows businesses to explore diverse applications, from high-end packaging to custom signage, ensuring exceptional product differentiation. Moreover, the instant UV curing mechanism ensures that each layer is solidified quickly, making multi-layer printing for embossing both precise and time-efficient.
Another advantage lies in the precision of digital control offered by advanced UV printing systems. Machines equipped with a high-resolution print head can achieve layer heights with tolerances as low as 1 micron. This precise control over UV layer thickness enables a more dynamic 3D texture, offering not only visual depth but also an appealing tactile experience. For B2B clients, such capability translates to a substantial return on investment (ROI), as premium finishes command higher margins and appeal to niche markets such as luxury goods and brand packaging.
Beyond aesthetics, the operational efficiency of UV printers significantly enhances production scalability. Automated multi-pass printing and reduced material waste lower operational costs, whereas high-speed setups with advanced gantry systems ensure faster production cycles. Companies can take advantage of these features to meet the growing demand for textured packaging and customized products in bulk, reinforcing their competitive edge in the market.
Frequently Asked Questions
Q1: How long does it take for UV varnish to fully cure during embossing?
UV varnish typically cures instantaneously under a UV lamp. However, for thicker layers used in embossing, additional curing time or multiple passes may be required to achieve optimal results without compromising the design's precision.
Q2: Can UV printing with 3D varnish & embossing be used for outdoor applications?
Yes, UV-cured prints are highly durable and resistant to environmental elements such as UV rays, moisture, and temperature fluctuations. When combined with proper substrates and coatings, the prints can maintain their integrity in outdoor environments.
Q3: What substrates work best for 3D varnish and embossing effects?
Substrates with smooth, non-absorbent surfaces, such as coated paper, PVC, acrylic, and aluminum, produce the best results. These materials enhance the adhesion of UV inks and allow for sharper, more defined embossed finishes.
Q4: Is special software required to prepare layered designs for embossing?
While most standard design software like Adobe Illustrator or CorelDRAW can create layered files, it is crucial to configure spot colors and layer separations properly. Many UV printer manufacturers also provide proprietary RIP software to streamline file preparation tailored to specific UV machines.
Q5: How do I ensure consistency across large-scale production runs?
Ensure that your UV printer is calibrated correctly, and establish a set of standard operating procedures for file preparation, machine settings, and curing parameters. Regular maintenance and periodic test printing further help maintain consistency and avoid production downtime.